Saturday 4 July 2015

Using of Flashback Database

Database can be flashed back either through SQL*Plus or RMAN.

  1. In SQL*Plus, you can use this feature by issuing of the SQL command FLASHBACK DATABASE statement. For the command syntax, see: Oracle Database SQL Reference - 10g Release 2 (10.2) - Chapter 18 SQL Statements: DROP SEQUENCE to ROLLBACK - FLASHBACK DATABASE
  2. In RMAN, you can use this feature by issuing of the command FLASHBACK. For the command syntax, see: Oracle Database Backup and Recovery Reference - 10g Release 2 (10.2) - Chapter 2 RMAN Commands - FLASHBACK Command
If there is an event (human error) that insists the database to be flashed back to a point in time, you can do this in few steps:

1. Ensure that you are not dealing with some kind of media failure. The Flashback Database is useful only when your data is logically corrupted.

2. Find the desired point in time for the flashback operation. Usually it is he time just before the time when some human error caused a logical damage of the database data. You can calculate this as SCN or a Date (TIMESTAMP expression). Additionally, you can use a restore point or a time just before last RESETLOGS operation. A Log Sequence Number can be used in 10g R1 but it is not available as an option in 10g R2 (via SQL*Plus). It is still available as an option in RMAN.

3. Find the current oldest SCN and time to which the database can be backwarded:
SQL> SELECT oldest_flashback_scn,oldest_flashback_time FROM v$flashback_database_log;
If the desired time is after the oldest time currently recorded in the flashback log files then go to the next step

4. Ensure that there are not tablespaces with disabled flashback logging:
SQL> SELECT NAME tbs_name,file_name db_file,flashback_on fb_logging, online_status status FROM v$tablespace,dba_data_files WHERE NAME=tablespace_name;
If there are files with no important data that are excluded from flashback logging then you can follow steps from the section: Dealing with Excluded Tablespaces in case of Flashback Database Operations
Otherwise, go to the next step.

5. Ensure that all needed archived and redo logs (covering the whole time period between oldest_flashback_time column value and the time of failure) are available:
5.1 Check physical availability:
RMAN> CROSSCHECK ARCHIVELOG FROM SCN oldest_flashback_scn;
Where oldest_flashback_scn is the value of the column oldest_flashback_scn in V$FLASHBACK_DATABASE_LOG.
5.2 Check logical availability:
RMAN> REPORT UNRECOVERABLE;
REPORT UNRECOVERABLE command reports all datafiles that cannot be recovered from existing backups because redo may be missing.
You can check the logical availability of archived redo logs with the following SQL as well:
SQL> SELECT * FROM v$archived_log WHERE first_change# > = oldest_flashback_scn AND status = 'A';
Where oldest_flashback_scn is the value of the column oldest_flashback_scn in V$FLASHBACK_DATABASE_LOG.

6. Find and write down the current SCN (or create a normal restore point if you are using 10g R2). Don’t forget that the Flashback Database is a change on the database and it must be recorded if some failure occurs during this operation.
SQL> SELECT current_scn FROM v$database;
or
SQL> CREATE RESTORE POINT before_flashback_operation;
To map a time value and SCN, you can use the built-in SQL functions (available since 10g):
SCN_TO_TIMESTAMP – to find associated timestamp with this SCN
TIMESTAMP_TO_SCN – to find associated SCN with this timestamp
SQL> SELECT current_scn, scn_to_timestamp(current_scn) FROM v$database;
This timestamp mapping information is recorded in the SMON_SCN_TIME table.
Oracle keeps the information in SMON_SCN_TIME table for a period of 5 days.

7. Restart the database in MOUNT stage
7.1 SQL> SHUTDOWN IMMEDIATE
7.2 SQL> STARTUP MOUNT
For RAC environments, use:
SQL> STARTUP MOUNT EXCLUSIVE
If you want to be able to return the database to its state just as it was closed, you can create a restore point at this moment (restore points can be created even in MOUNT stage):
SQL> CREATE RESTORE POINT just_after_shutdown;
Or to find the last checkpointed SCN:
SQL> SELECT checkpoint_change# FROM v$database;
In the next step, if you perform a few flashback operations and you need to return the database to its state just before to be closed, you will need the above SCN.

8. Flashback the Database
For this example the point of time before the logical corruption is:
As SCN: 4125962274
As Timestamp: 24.05.2006 15:10
In SQL it can be done by FLASHBACK DATABASE command. In RMAN it can be done by FLASHBACK command.
Different types of usage:
8.1. Flashes back the database to a point in time just as in the specified SCN:
SQL> FLASHBACK DATABASE TO SCN 4125962274; /* returns database to its state as in the point in time marked with SCN 4125962274 */
8.2. Flashes back the database to a point in time just as in the specified TIMESTAMP (by using of custom TIMESTAMP value):
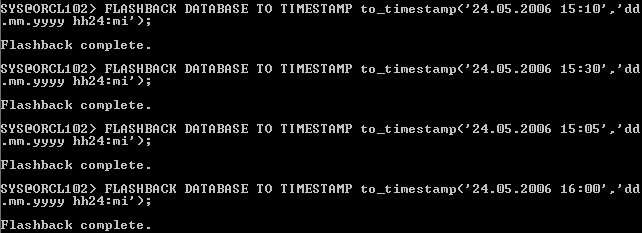
SQL> FLASHBACK DATABASE TO TIMESTAMP to_timestamp('24.05.2006 15:10','dd.mm.yyyy hh24:mi'); /* returns database to its state as in the point in time 24.05.2006 15:10 */
8.3. Flashes back the database to a point in time just as in the specified TIMESTAMP (by using of SYSTIMESTAMP)
SQL> FLASHBACK DATABASE TO TIMESTAMP (SYSTIMESTAMP -1/24); /* returns database to its state as in the point in time one hour ago */
8.4. Flashes back the database to a point in time just as in the specified TIMESTAMP (by using of SYSTIMESTAMP and INTERVAL):
SQL> FLASHBACK DATABASE TO TIMESTAMP (SYSTIMESTAMP - INTERVAL '1' MINUTE); /* returns database to its state as in the point in time one minute ago */
8.5. Flashes back the database to a point in time just as in the specified restore point
SQL> FLASHBACK DATABASE TO RESTORE POINT before_flashback_operation; /* returns database to its state as in the point in time marked with the restore point with name before_flashback_operation */
8.6. Flashbacks the database to the point in time just before the last RESETLOGS operation
SQL> FLASHBACK DATABASE TO BEFORE RESETLOGS;
8.7. Flashes back the database to a SCN just before the specified SCN
SQL> FLASHBACK DATABASE TO BEFORE SCN 4125962274;
8.8. Flashes back the database to a point in time one second before the specified TIMESTAMP
SQL> FLASHBACK DATABASE TO BEFORE TIMESTAMP to_timestamp('24.05.2006 15:10','dd.mm.yyyy hh24:mi');
SQL> FLASHBACK DATABASE TO BEFORE TIMESTAMP (SYSDATE -1/24); SQL> FLASHBACK DATABASE TO BEFORE TIMESTAMP (SYSTIMESTAMP - INTERVAL '1' MINUTE);
8.9. Flashes back the database to a point in time just before the specified restore point
SQL> FLASHBACK DATABASE TO BEFORE RESTORE POINT before_flashback_operation;
8.10. Flashing back of the database via RMAN
RMAN> FLASHBACK DATABASE TO SCN 4125962274; RMAN> FLASHBACK DATABASE TO TIMESTAMP (SYSDATE-1/24); RMAN> FLASHBACK DATABASE TO TIMESTAMP to_timestamp('24.05.2006 15:10','dd.mm.yyyy hh24:mi');
RMAN> FLASHBACK DATABASE TO RESTORE POINT before_flashback_operation; RMAN> FLASHBACK DATABASE TO BEFORE RESETLOGS;

Let’s demonstrate the ‘Time Machine’ capabilities of this feature:


As it can be seen, the Flashback feature allows you to shift within the time as it doesn’t exist. In some articles it is called a “rewind” button but its abilities as a “forward” button make this feature to behave as a “Time Machine” device for your data.
I want to note here again that you can move forward in time only with applying of redo logs. You can backward in time by applying flashback logs along with smaller amount of redo data.
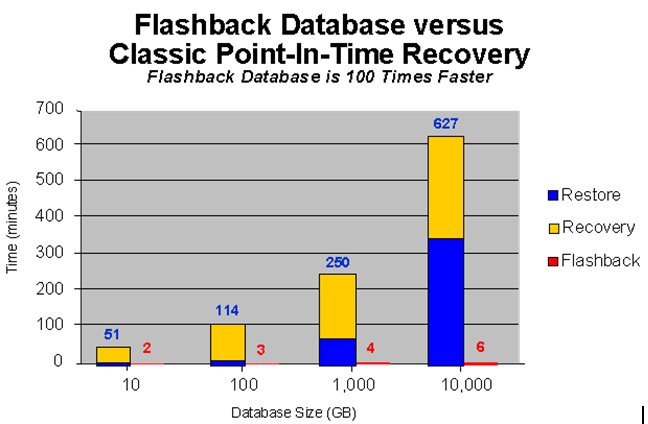
Be aware of that you will be able to travel through the time only if you are well prepared for it. You must have all flashback and archived redo logs for the whole time period. With the Flashback Database you can return database to its state as in every point in time in an extremely fast way. The speed of this operation depends only of the number of the applied flashback logs and this mainly depends of the number of the data block changes within the database for this time period. It doesn’t depend on the database size because no restore operation is performed. Usually this operation can complete even within several seconds or minutes and can be between 25 to 105 times faster than usual incomplete media recovery.
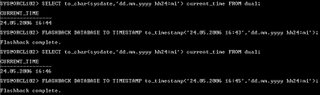
Flashback logs are still populated during every performed flashback operation. RVWR doesn’t care if the database is in either MOUNT or OPEN stage. Flashback logs are generated because the data blocks within datafiles are changing and the before-images of data must be recorded as well even that the database is not opened. You can see this behavior in the following example:


9. Open the Database with OPEN RESETLOGS clause:
SQL> ALTER DATABASE OPEN RESETLOGS;


Thanks.


How to Configure Flashback Database?

1. Before to configure Flashback Database, you must ensure that:

  • Your database is running in ARCHIVELOG mode
  • FRA (Flash Recovery Area) is configured
  • FRA is configured by two parameters:
  • DB_RECOVERY_FILE_DEST
  • DB_RECOVERY_FILE_DEST_SIZE
For more info about configuring the FRA, see: Oracle Database Backup and Recovery Basics - 10g Release 2 (10.2) - Chapter 3.5 Setting Up a Flash Recovery Area for RMAN
  • COMPATIBILITY initialization parameter is set to 10.0 or higher value

2. Consider the value for flashback database window.
It can be set by an initialization parameter: DB_FLASHBACK_RETENTION_TARGET. The range of SCNs for which there is currently enough flashback log data to support the FLASHBACK DATABASE command is called the Flashback Database Window.
The flashback window depends of the current environment requirement but usually it can be between 24 and 72 hours. Don’t consider too big values for flashback window because if you need to perform flashback database operation to a point in time older than several days it can be slower and much more time-consuming operation than using of media recovery method.
Flashback Database is efficient and fast for smaller time spans when the error is immediately (or within few hours) discovered and performing of a Database Point-in-Time Recovery is the only one way to recover from this human error.
Default value for DB_FLASHBACK_RETENTION_TARGET is 1440. It is measured in minutes, so by default flashback window is 24 hours.
Keep in mind that flashback logs use additional space within the FRA. For more info about sizing of FRA to include Flashback Logs, see:
Oracle Database Backup and Recovery Basics - 10g Release 2 (10.2) - Chapter 5.3 Setup and Maintenance for Oracle Flashback Database - Sizing the Flash Recovery Area to Include Flashback Logs

3. Connect as user SYS with SYSDBA privileges.

4. Configure DB_FLASHBACK_RETENTION_TARGET:
SQL> ALTER SYSTEM SET DB_FLASHBACK_RETENTION_TARGET=1440 SCOPE=BOTH;
5. Shut down the database:
SQL> SHUTDOWN IMMEDIATE

6. Start the database in MOUNT stage.
To enable Flashback Database feature, your database must be in MOUNT mode.
SQL> STARTUP MOUNT
For RAC environments, use:
SQL> STARTUP MOUNT EXCLUSIVE

7. Enable Flashback Database Feature:
SQL> ALTER DATABASE FLASHBACK ON;

8. Check whether the Flashback Database feature is enabled or not:
SQL> SELECT flashback_on FROM V$DATABASE;

9. Open the database with enabled Flashback Database feature:
SQL> ALTER DATABASE OPEN;

Configuration with Enterprise Manager:
The Flashback Database Feature can be enabled via Enterprise Manager as well.
Go to: Maintenance Tab -> Backup/Recovery Settings -> Recovery Settings


Excluding Tablespaces from Flashback Logging
By default, flashback logs are generated for all permanent tablespaces. If you want, you can disable flashback logging for specific tablespaces.
For example, if you want disable flashback generation for specific tablespace you can use the following command:
SQL> ALTER TABLESPACE USERS FLASHBACK OFF;

If you want to re-enable flashback logging for this tablespace, you can do it only in MOUNT stage.
SQL> SHUTDOWN IMMEDIATE
SQL> STARTUP MOUNT
SQL> ALTER TABLESPACE USERS FLASHBACK ON;
SQL> ALTER DATABASE OPEN;
During a Flashback Operation you must use more actions to handle with missing flashback data for these tablespaces. For more info, see section: Dealing with Excluded Tablespaces During Flashback Operations.


Thanks.


What are the Benefits of Flashback Database?

According to many studies and reports, Human Error accounts for 30-35% of data loss episodes. This makes Human Errors one of the biggest single causes of downtime.
With Flashback Database feature Oracle is trying to fight against user and operator errors in an extremely fast and effective way.
You can find more info about most common causes of data loss in the following sources:

In most cases, a disastrous logical failure caused by human error can be solved by performing a Database Point-in-Time Recovery (DBPITR). Before 10g the only way to do a DBPITR was incomplete media recovery. Media Recovery is a slow and time-consuming process that can take a lot of hours. On the other side, by using of Flashback Database a DBPITR can be done in an extremely fast way: 25 to 105 times faster than usual incomplete media recovery and in result it can minimize the downtime significantly.
For more info about the recovery speed advantages of Flashback Database, you can use the following source:
Oracle Flashback Technology, an Oracle article by Ron Weiss, Director of Product Management in Oracle's Database Kernel Development Group


Flashback Database provides:
  • Very effective way to recover from complex human errors
  • Faster database point-in-time recovery
  • Simplified management and administration
  • Little performance overhead
It provides a lot of benefits and almost no disadvantages.
I will try to discuss all of them in the sections below.
The Flashback Database is not just your database “rewind” button. It is a “Time Machine” for your Database data that is one single command away from you.

The Flashback Database Architecture

Flashback Database uses its own type of log files, called Flashback Database Log Files.
To support this mechanism, Oracle uses new background process called RVWR (Recovery Writer) and a new buffer in the SGA, called Flashback Buffer.
The Oracle database periodically logs before images of data blocks in the flashback buffer. The flashback buffer records images of all changed data blocks in the database. This means that every time a data block in the database is altered, the database writes a before image of this block to the flashback buffer. This before image can be used to reconstruct a datafile to the current point of time.
The maximum allowed memory for the flashback buffer is 16 MB. You don’t have direct control on its size. The flashback buffer size depends on the size of the current redo log buffer that is controlled by Oracle. Starting at 10g R2, the log buffer size cannot be controlled manually by setting the initialization parameter LOG_BUFFER.
In 10G R2, Oracle combines fixed SGA area and redo buffer together. If there is a free space after Oracle puts the combined buffers into a granule, that space is added to the redo buffer. The sizing of the redo log buffer is fully controlled by Oracle. According to SGA and its atomic sizing by granules, Oracle will calculate automatically the size of the log buffer depending of the current granule size. For smaller SGA size and 4 MB granules, it is possible redo log buffer size + fixed SGA size to be multiple of the granule size. For SGAs bigger than 128 MB, the granule size is 16 MB.
You can see current size of the redo log buffer, fixed SGA and granule by querying the V$SGAINFO view.
You can query the V$SGASTAT view to display detailed information on the SGA and its structures.
To find current size of the flashback buffer, you can use the following query:
SQL> SELECT * FROM v$sgastat WHERE NAME = 'flashback generation buff';There is no official information from Oracle that confirms the relation between 'flashback generation buff' structure in SGA and the real flashback buffer structure. This is only a suggestion.
A similar message message is written to the alertSID.log file during opening of the database:
Allocated 3981204 bytes in shared pool for flashback generation buffer Starting background process RVWR RVWR started with pid=16, OS id=5392
For more info about the sizing restrictions of log buffer in 10g R2, see Metalink Note: 351857.1: The Log_buffer Cannot be Changed In 10g R2
For more info about the granule model in the SGA (available since Oracle9i), see Metalink Note: 148495.1: Oracle9i New Feature: Dynamic SGA
The flashback buffer size is at least two times bigger than the log buffer size. This assertion can be found in OCP Oracle Database 10g : New Features for Administrators by Sam Alapati
Although flashback buffer size is expected to be at least two times bigger than log buffer size, its real size can be smaller. In tested 10g R2 environment, flashback buffer has around two times smaller size as the redo log buffer.
Granule Size: 4194304
Fixed SGA Size: 1289832
Log Buffer: 7098368
Flashback Buffer (flashback generation buff): 3981204
This rule is mentioned indirectly in the Oracle documentation: Oracle Database Backup and Recovery Basics - 10g Release 2 (10.2) - Chapter 5.3 Setup and Maintenance for Oracle Flashback Database - Performance Tuning for Flashback Database:
For large, production databases, set the init.ora parameter LOG_BUFFER to be at least 8MB. This makes sure the database allocates maximum memory (typically 16MB) for writing flashback database logs.
The RVWR background process has responsibility to write the contents of flashback buffer to flashback log files. This process is started automatically when flashback database feature is enabled.
RVWR writes periodically flashback buffer contents to flashback database logs. It is an asynchronous process and you don’t have control over it. All available sources are saying that RVWR writes periodically to flashback logs. The explanation for this behavior is that Oracle is trying to reduce the I/O and CPU overhead that can be an issue in many production environments.
The RVWR writing mechanism and its behavior needs more investigation that will not be discussed here. It can be seen that it is controlled by few hidden parameters in a similar way like writing to redo log files – depending of generated flashback redo and time interval.
Flashback log files can be created only under the Flash Recovery Area (that must be configured before enabling the Flashback Database functionality). RVWR creates flashback log files into a directory named “FLASHBACK” under FRA. The size of every generated flashback log file is again under Oracle’s control. According to current Oracle environment – during normal database activity flashback log files have size of 8200192 bytes. It is very close value to the current redo log buffer size. The size of a generated flashback log file can differs during shutdown and startup database activities. Flashback log file sizes can differ during high intensive write activity as well.
Flashback log files can be written only under FRA (Flash Recovery Area). FRA is closely related and is built on top of Oracle Managed Files (OMF). OMF is a service that automates naming, location, creation and deletion of database files. By using OMF and FRA, Oracle manages easily flashback log files. They are created with automatically generated names with extension .FLB. For instance, this is the name of one flashback log file: O1_MF_26ZYS69S_.FLB
By its nature flashback logs are similar to redo log files. LGWR writes contents of the redo log buffer to online redo log files, RVWR writes contents of the flashback buffer to flashback database log files. Redo log files contain all changes that are performed in the database, that data is needed in case of media or instance recovery. Flashback log files contain only changes that are needed in case of flashback operation. The main differences between redo log files and flashback log files are:
  • Flashback log files are never archived - they are reused in a circular manner.
  • Redo log files are used to forward changes in case of recovery while flashback log files are used to backward changes in case of flashback operation
Flashback log files can be compared with UNDO data (contained in UNDO tablespaces) as well. While UNDO data contains changes at the transaction level, flashback log files contain UNDO data at the data block level. While UNDO tablespace doesn’t record all operations performed on the database (for instance, DDL operations), flashback log files record that data as well. In few words, flashback log files contain the UNDO data for your database. To summarize:
  • UNDO data doesn’t contain all changes that are performed in the database while flashback logs contain all altered blocks in the database
  • UNDO data is used to backward changes at the transaction level while flashback logs are used to backward changes at the database level
You can query the V$FLASHBACK_DATABASE_LOGFILE to find detailed info about your flashback log files. Although this view is not documented it can be very useful to check and monitor generated flashback logs.

There is a new record section within the control file header that is named FLASHBACK LOGFILE RECORDS. It is similar to LOG FILE RECORDS section and contains info about the lowest and highest SCN contained in every particular flashback database log file

***************************************************************************
FLASHBACK LOGFILE RECORDS
***************************************************************************
(size = 84, compat size = 84, section max = 2048, section in-use = 136,
last-recid= 0, old-recno = 0, last-recno = 0)
(extent = 1, blkno = 139, numrecs = 2048)
FLASHBACK LOG FILE #1:
(name #4) E:\ORACLE\FLASH_RECOVERY_AREA\ORCL102\FLASHBACK\O1_MF_26YR1CQ4_.FLB
Thread 1 flashback log links: forward: 2 backward: 26
size: 1000 seq: 1 bsz: 8192 nab: 0x3e9 flg: 0x0 magic: 3 dup: 1
Low scn: 0x0000.f5c5a505 05/20/2006 21:30:04
High scn: 0x0000.f5c5b325 05/20/2006 22:00:38
What does a Flashback Database operation?

When you perform a flashback operation, Oracle needs all flashback logs from now on to the desired time. They will be applied consecutively starting from the newest to the oldest.
For instance, if you want to flashback the database to SCN 4123376440, Oracle will read flsahback logfile section in control file and will check for the availability of all needed flashback log files. The last needed flashback log should be this with Low scn and High scn values between the desired SCN 4123376440.
In current environment this is the file with name: O1_MF_26YSTQ6S_.FLB and with values of:
Low SCN: 4123374373
High SCN: 4123376446
Note: If you want to perform successfully a flashback operation you will always need to have available at least one archived (or online redo) log file. This is a particular file that contains redo log information about changes around the desired flashback point in time (SCN 4123376440). In this case, this is the archived redo log with name: ARC00097_0587681349.001 that has values of:
First change#: 4123361850
Next change#: 4123380675
The flashback operation will not succeed without this particular archived redo log.
The reason for this: Flashback log files contain information about before-images of data blocks, related to some SCN (System Change Number). When you perform flashback operation to SCN 4123376440, Oracle cannot apply all needed flashback logs and to complete successfully the operation because it applying before-images of data. Oracle needs to restore each data block copy (by applying flashback log files) to its state at a closest possible point in time before SCN 4123376440. This will guarantee that the subsequent “redo apply” operation will forward the database to SCN 4123376440 and the database will be in consistent state. After applying flashback logs, Oracle will perform a forward operation by applying all needed archive log files (in this case redo information from the file: ARC00097_0587681349.001) that will forward the database state to the desired SCN.
Oracle cannot start applying redo log files before to be sure that all data blocks are returned to their state before the desired point in time. So, if desired restore point of time is 10:00 AM and the oldest restored data block is from 09:47 AM then you will need all archived log files that contain redo data for the time interval between 09:47 AM and 10:00 AM. Without that redo data, the flashback operation cannot succeed.
A short explanation of this issue can be found in the documentation:
Oracle Database Backup and Recovery Basics -
10g Release 2 (10.2) - Chapter 5.1 - Restore Points and Flashback Database: Concepts
When a database is restored to its state at some past target time using Flashback Database, each block changed since that time is restored from the copy of the block in the flashback logs most immediately prior to the desired target time. The redo log is then used to re-apply changes since the time that block was copied to the flashback logs.
Note: Redo logs must be available for the entire time period spanned by the flashback logs, whether on tape or on disk. (In practice, however, redo logs are generally needed much longer than the flashback retention target to support point-in-time recovery.)
There is a lack of information about this specific behavior of the Flashback Database feature. The above quote is the only one place in Oracle documentation where it is mentioned.
There is another source that is trying to explain this behavior in a comprehensible way:
OCP Oracle Database 10g: New Features for Administrators – Chapter 9: Flashback Enhancements, by Sam Alapati

Flashback logs are not independent. They can be used only with the redo data that contains database changes around the desired SCN. This means that if you want to have working flashback window (and to be able to restore the database to any point in time within this window) you need to ensure the availability of redo logs as well.
If you are familiar with this information then you will be able to work in a better way with this feature and to ensure that it will help you to perform faster recovery without unexpected problems.

Availability within Oracle’s Editions

Oracle Flashback Database feature is available only in Oracle Enterprise and Oracle Personal Editions.
For more info, see Metalink Note: 271886.1: Differences Between Different Editions of Oracle Database 10G


Thanks.
 
The Flashback Database Feature


Introduction

The Flashback Database is one of the most powerful new features in Oracle 10g coming as a part of Backup & Recovery enhancements.
In this post you can find the result of my research and shared experience about this feature.

What is the Oracle Flashback Database?

Flashback Database is a part of the backup & recovery enhancements in Oracle 10g Database that are called Flashback Features.
The main purpose of Flashback Technology is to let you quickly recover from logical corruptions or user errors.
Oracle Flashback Features include the following:

    Flashback DATABASE
    Flashback DROP
    Flashback TABLE
    Flashback QUERY
    Flashback VERSIONS QUERY
    Flashback TRANSACTION QUERY


What says Oracle’s documentation about the Flashback Database Feature:
Oracle Database Backup and Recovery Basics -
10g Release 2 (10.2) - Chapter 5.1 - Restore Points and Flashback Database: Concepts

    Flashback Database enables you to wind your entire database backward in time, reversing the effects of unwanted database changes within a given time window. The effects are similar to database point-in-time recovery.

And:

    It is similar to conventional point in time recovery in its effects, allowing you to return a database to its state at a time in the recent past.

And:

    Flashback Database can be used to reverse most unwanted changes to a database, as long as the datafiles are intact.

From Oracle Database Concepts - 10g Release 2 (10.2) - Chapter 15 - Backup & Recovery

    Oracle Flashback Database lets you quickly recover an Oracle database to a previous time to correct problems caused by logical data corruptions or user errors.

Another quote from Metalink Note 268197.1: New Background Processes In 10g:

    - This a new feature introduced in 10g
    - Flashbacking a database means going back to a previous database state
    - The Flashback Database feature provides a way to quickly revert an entire Oracle database to the state it was in at a past point in time
    - This is different from traditional point in time recovery
    …
    - One can use Flashback Database to back out changes that:
    - Have resulted in logical data corruptions
    - Are a result of user error
    - This feature is not applicable for recovering the database in case of media failure
   
   
Thanks.
Here is the best script for killing sessions in Oracle, just run the script and copy/paste the output to kill sessions.

select ses.USERNAME,
    substr(MACHINE,1,10) as MACHINE,
    substr(module,1,25) as module,
    status,
    'alter system kill session '''||SID||','||ses.SERIAL#||''';' as kill
from v$session ses LEFT OUTER JOIN v$process p ON (ses.paddr=p.addr)
where schemaname <> 'SYS'
    and not exists
    (select 1
        from DBA_ROLE_PRIVS
        where GRANTED_ROLE='DBA'
            and schemaname=grantee)
    and machine!='yourlocalhostname'
order by LAST_CALL_ET desc;


Thanks.
How to Create A Batch File for Scheduling Backups in Oracle on Daily, Weekly, Monthly and Yearly basis. 


Folks,  below is the script which will create a batch file to run in Windows scheduler to take backups of databases on daily, weekly, monthly basis.

For your reference, I have also attached a .BAT file screenshot.


Steps :

1) Open notepad  and paste the text provided below. 

2) In this text, database name is SCANA, so you can change your db name accordingly.

3) Change the dpdump location in text.

4) Save the changes and save as .bat file as shown in screenshot.

5) Create a task in windows scheduler and schedule the time for batch file to run.

----------------------------
 
set ORACLE_SID=SCANA
set day=%date:~0,3%
set month=%date:~4,2%
set daydate=%date:~7,2%
set year=%date:~-4%
set hour=%time:~0,1%
set minute=%time:~3,2%
set backup_date_time=%daydate%_%month%_%year%_%hour%_%minute%
expdp system/password@SCANA directory=data_pump_dir dumpfile=SCANA_%backup_date_time%.dmp logfile=SCANA_%backup_date_time%.log FULL=Y
forfiles -p "D:\app\Admin\admin\SCANA\dpdump" -s -m SCANA*.* -d -2 -c "cmd /c del @file"


---------------------------- 


Thanks.


Viewing Oracle Compilation Errors :

 
When creating procedures, functions, packages, triggers, or package bodies via Oracle, if there are compilation errors, Oracle will store these errors in a system table.

To view these errors, you will need to know the type of object being compiled, such as a procedure, and the name of the object. With this information, the following query can be executed.

select * from SYS.USER_ERRORS where NAME = <object_name> and type = <object_type>

For example, if attempting to create a procedure via the following command:

------------------------


CREATE OR REPLACE PROCEDURE RAISE_SALARY(dept_no number, percentage number) AS
employee_salary EMPLOYEE.SALARY%TYPE;
CURSOR ECursor IS
    SELECT SALARY FROM EMPLOYEE where DNO = dept_no FOR UPDATE;
BEGIN
    OPEN ECursor;
    LOOP
    FETCH ECursor into employee_salary;
    EXIT WHEN ECursor%NOTFOUND;
    UPDATE EMPLOYEE SET SALARY = (employee_salary*percentage)
        WHERE CURRENT OF ECursor;
    END LOOP;
    CLOSE ECursor;
    COMMIT;
END RAISE_SALARY;
/


-----------------------

 To view any errors associated with the above procedure, you can use the following query:

select * from SYS.USER_ERRORS where NAME = 'RAISE_SALARY' and type = 'PROCEDURE';

Let's say, for example, that the table EMPLOYEE does not exist. The above query will then return an error such as the following:

PL/SQL: ORA-00942: table or view does not exist

The type column can be types such as the following:

PROCEDURE
FUNCTION
PACKAGE
PACKAGE BODY
TRIGGER


Friday 3 July 2015

Oracle Reinvents Database Protection with Zero Data Loss Recovery Appliance

Worth reading article by Oracle Press

http://www.oracle.com/us/corporate/press/2313883


Cheers!
Snapshot Standby - Step by Step Configuration

Snapshot standby database is a fully updateable standby database created by converting a physical standby database into a snapshot standby database. A snapshot standby database receives and archives, but does not apply, redo data from a primary database. The redo data received from the primary database is applied once a snapshot standby database is converted back into a physical standby database, after discarding all local updates to the snapshot standby database.

1. Configured flash recovery area, check database flashback enable, must enable it if not.

SQL> alter system set db_recovery_file_dest_size = 2G;
SQL> alter system set db_recovery_file_dest= 'D:\app\db_recov';

SQL> SELECT FLASHBACK_ON FROM V$DATABASE;

2. Cancel managed recovery mode on physical standby database

SQL> alter database recover managed standby database cancel;

3. Convert physical standby database to snapshot standby database

SQL> alter database convert to snapshot standby;

4. Recycle the database:

SQL> shutdown immediate
SQL> startup
SQL> select open_mode, database_role from v$database;

You can see database enable for read/write operations

5. Convert snapshot standby database back to physical standby database:

SQL> connect / as sysdba
SQL> shutdown immediate
SQL> startup mount
SQL> alter database convert to physical standby;
SQL> shutdown

Start managed recovery process:

SQL> alter database recover managed standby database disconnect;
SQL> select open_mode, database_role from v$database;


Snapshot Standby - Step by Step Configuration  :

Snapshot standby database is a fully updateable standby database created by converting a physical standby database into a snapshot standby database. A snapshot standby database receives and archives, but does not apply, redo data from a primary database. The redo data received from the primary database is applied once a snapshot standby database is converted back into a physical standby database, after discarding all local updates to the snapshot standby database.

1. Configured flash recovery area, check database flashback enable, must enable it if not.

SQL> alter system set db_recovery_file_dest_size = 2G;SQL> alter system set db_recovery_file_dest= '/db_recov';

SQL> SELECT FLASHBACK_ON FROM V$DATABASE;

2. Cancel managed recovery mode on physical standby database

SQL> alter database recover managed standby database cancel;

3. Convert physical standby database to snapshot standby database

SQL> alter database convert to snapshot standby;

4. Recycle the database:

SQL> shutdown immediate
SQL> startup
SQL> select open_mode, database_role from v$database;

You can see database enable for read/write operations

5. Convert snapshot standby database back to physical standby database:

SQL> connect / as sysdba
SQL> shutdown immediate
SQL> startup mount
SQL> alter database convert to physical standby;
SQL> shutdown

Start managed recovery process:

SQL> alter database recover managed standby database disconnect;
SQL> select open_mode, database_role from v$database;

Cheers!


Oracle Data Guard (Introduction)


Oracle Data Guard is the management, monitoring, and automation software infrastructure that creates, maintains, and monitors one or more standby databases to protect enterprise data from failures, disasters, errors, and corruptions.

Data Guard maintains these standby databases as transactionally consistent copies of the production database. These standby databases can be located at remote disaster recovery sites thousands of miles away from the production data center, or they may be located in the same city, same campus, or even in the same building. If the production database becomes unavailable because of a planned or an unplanned outage, Data Guard can switch any standby database to the production role, thus minimizing the downtime associated with the outage, and preventing any data loss.

Available as a feature of the Enterprise Edition of the Oracle Database, Data Guard can be used in combination with other Oracle High Availability (HA) solutions such as Real Application Clusters (RAC), Oracle Flashback and Oracle Recovery Manager (RMAN), to provide a very high level of data protection and data availability that is unprecedented in the industry..

Data Guard Configurations
A Data Guard configuration consists of one production (formally known as primary) database and up to nine/9 standby databases. The databases in a Data Guard configuration are connected by Oracle Net and may be dispersed geographically. There are no restrictions on where the databases are located, provided that they can communicate with each other. However, for disaster recovery, it is recommended that the standby databases be hosted at sites that are geographically separated from the primary site.

· Primary Database
A Data Guard configuration contains one production database, also referred to as the primary database, that functions in the primary role. This is the database that is accessed by most of your applications. The primary database can be either a single-instance Oracle database or an Oracle Real Application Clusters database.

· Standby Database
A standby database is a transactionally consistent copy of the primary database. Using a backup copy of the primary database, you can create up to nine standby databases and incorporate them in a Data Guard configuration. Once created, Data Guard automatically maintains each standby database by transmitting redo data from the primary database and then applying the redo to the standby database. Similar to a primary database, a standby database can be either a single-instance Oracle database or an Oracle Real Application Clusters database.

Standby Database Types
Following are the standby database types:

· Physical Standby Database- A physical standby database provides a physically identical copy of the primary database, with on-disk database structures that are identical to the primary database on a block-for-block basis. The database schemas, including indexes, are the same. The Redo Apply technology applies redo data on the physical standby database using standard Oracle media recovery techniques.
· Active Data Guard
An Active Data Guard standby database is an exact copy of the primary that is open read-only while it continuously applies changes transmitted by the primary database. An active standby can offload ad-hoc queries, reporting, and fast incremental backups from the primary database, improving performance and scalability while preventing data loss or downtime due to data corruptions, database and site failures, human error, or natural disaster.

· Snapshot Standby
A snapshot standby database is a fully updateable standby database created by converting a physical standby database into a snapshot standby database. A snapshot standby database receives and archives, but does not apply, redo data from a primary database. The redo data received from the primary database is applied once a snapshot standby database is converted back into a physical standby database, after discarding all local updates to the snapshot standby database.

· Logical standby database
A logical standby database contains the same logical information as the production database, although the physical organization and structure of the data can be different. The SQL apply technology keeps the logical standby database synchronized with the primary database by transforming the data in the redo logs received from the primary database into SQL statements and then executing the SQL statements on the standby database. A logical standby database can be used for other business purposes in addition to disaster recovery requirements. This makes it possible for the logical standby database to be accessed for queries and reporting purposes at the same time the SQL is being applied to it. Thus, a logical standby database can be used concurrently for data protection and reporting and database upgrades.

Data Guard provides two methods to apply this redo data to the standby database and keep it transactionally consistent with the primary, and these methods correspond to the two types of standby databases supported by Data Guard. Redo Apply, used for Physical Standby databases SQL Apply, used for Physical Standby databases


Data Guard Protection Modes
Data Guard provides three modes of data protection to balance cost, availability, performance, and data protection. These modes define the rules that govern the behavior of the Data Guard configuration, and can be set easily using any of the available management interfaces, e.g. using the following simple SQL statement on the primary database:

SQL>ALTER DATABASE SET STANDBY DATABASE TO MAXIMIZE {PROTECTION AVAILABILITY PERFORMANCE};

To determine the appropriate data protection mode, enterprises need to weigh their business requirements for data protection against user demands for system response time. The following table outlines the suitability of each mode from a risk of data loss perspective.

· Maximum Protection—This mode offers the highest level of data protection. Data is synchronously transmitted to the standby database from the primary database and transactions are not committed on the primary database unless the redo data is available on at least one standby database configured in this mode. If the last standby database configured in this mode becomes unavailable, processing stops on the primary database. This mode ensures no-data-loss.

· Maximum Availability—This mode is similar to the maximum protection mode, including zero data loss. However, if a standby database becomes unavailable (for example, because of network connectivity problems), processing continues on the primary database. When the fault is corrected, the standby database is automatically resynchronized with the primary database.

· Maximum Performance—This mode offers slightly less data protection on the primary database, but higher performance than maximum availability mode. In this mode, as the primary database processes transactions, redo data is asynchronously shipped to the standby database. The commit operation of the primary database does not wait for the standby database to acknowledge receipt of redo data before completing write operations on the primary database. If any standby destination becomes unavailable, processing continues on the primary database and there is little effect on primary database performance

Data Guard Services
The following sections explain how Data Guard manages the transmission of redo data, the application of redo data, and changes to the database roles:

Log Transport Services—Control the automated transfer of redo data from the production database to one or more archival destinations.

Log Apply Services—Apply redo data on the standby database to maintain transactional synchronization with the primary database. Redo data can be applied either from archived redo log files, or, if real-time apply is enabled, directly from the standby redo log files as they are being filled, without requiring the redo data to be archived first at the standby database.

Data Guard provides two methods to apply this redo data to the standby database and keep it transactionally consistent with the primary, and these methods correspond to the two types of standby databases supported by Data Guard.

Redo Apply, used for Physical Standby databases
SQL Apply, used for Physical Standby databases

Role Management Services
Change the role of a database from a standby database to a primary database, or from a primary database to a standby database using either a switchover or a failover operation.

A database can operate in one of the two mutually exclusive roles: primary or standby database.

· Failover During a failover, one of the standby databases takes the new primary database role, when an unplanned failure occurs on the primary database. This enables recovery time objectives to be achieved by quickly promoting the standby to the primary role instead incurring downtime while the events that impact the primary are diagnosed and resolved.

· Switchover A switchover is used to reduce primary database downtime during planned outages, such as operating system or hardware upgrades, or rolling upgrades of the Oracle database software and patch sets. A switchover operation requires all user sessions to be disconnected from the primary database. Following that, the primary database is transitioned to the standby role, after which the standby database is transitioned to the primary role.For example – the following single Data Guard Broker CLI (DGMGRL) command initiates and completes the switchover to the standby database “Chicago”:


DGMGRL> SWITCHOVER TO STANDBY;

Once initiated, Data Guard automates the actual role transition processes. No data is lost in the process.

· Fast-Start Failure
Fast-Start Failover Fast-Start Failover allows Data Guard to automatically fail over to a previously chosen, standby database without requiring any manual steps to invoke the failover. Further, upon return of the failed primary, it is automatically reinstated into the configuration as a standby of the new primary database. Fast-Start Failover can be used only in a Data Guard Broker configuration and can be configured only through DGMGRL or Enterprise Manager.

DGMGRL> FAILOVER TO STANDBY;

A manual failover operation ensures zero data loss if Data Guard was being run in the Maximum Protection or Maximum Availability and the target standby database was synchronized at the time of the failover.

Primary and standby database can continue to alternate roles. The primary database can switch the role to a standby database; and one of the standby databases can switch roles to become the primary.

The main difference between physical and logical standby databases is the manner in which log apply services apply the archived redo data:

For physical standby databases, Data Guard uses Redo Apply technology, which applies redo data on the standby database using standard recovery techniques of an Oracle database, as shown in Figure.

For logical standby databases, Data Guard uses SQL Apply technology, which first transforms the received redo data into SQL statements and then executes the generated SQL statements on the logical standby database.

Data Guard Interfaces

Oracle provides three ways to manage a Data Guard environment:

1. SQL*Plus and SQL Statements
Using SQL*Plus and SQL commands to manage Data Guard environment. The following SQL statement initiates a switchover operation:

SQL> alter database commit to switchover to physical standby;

2. Data Guard Broker GUI Interface (Data Guard Manager)
Data Guard Manger is a GUI version of Data Guard broker interface that allows you to automate many of the tasks involved in configuring and monitoring a Data Guard environment.

3. Data Guard Broker Command-Line Interface (CLI)
It is an alternative interface to using the Data Guard Manger. It is useful if you want to use the broker from batch programs or scripts. You can perform most of the activities required to manage and monitor the Data Guard environment using the CLI.

The Oracle Data Guard broker is a distributed management framework that automates and centralizes the creation, maintenance, and monitoring of Data Guard configurations.

You can perform all management operations locally or remotely through the broker’s easy-to-use interfaces: the Data Guard web pages of Oracle Enterprise Manager, which is the broker’s graphical user interface (GUI), and the Data Guard command-line interface (CLI) called DGMGRL.


Source : Oracle Corporation.


RMAN Backup & Recovery Step by Step Process for Windows O.S. :

Folks, here are all the steps for RMAN and its step by step for simple understanding. I hope there won't be any confusion while going through the following steps.

RMAN Backup & Recovery Step by Step Process for Windows :

The RMAN ambiance consists of the utilities and databases that comedy a role in abutment up your data. At a minimum, the ambiance for RMAN charge accommodate the following:

The ambition database to be backed up

The RMAN client, which interprets advancement and accretion commands, directs server sessions to assassinate those commands, and annal your advancement and accretion action in the ambition database ascendancy file.

Logical Backup : backup utility that performs backups on the logical components of the database. A logical backup consists of backing up the database at the tablespace level or backing up other logical database components such as a table.

Physical Backup: Backing up the database files such as the datafiles, control files, and redo log file

RMAN Repository and Control Files


The RMAN utility uses two methods of storing information about the target databases that are backed up. Oracle calls the collection of metadata about the target databases the RMAN repository There are two methods of storing data in the RMAN repository.

Recovery Catalog

The first method is by accessing an RMAN catalog of information about backups. The second method is by accessing the necessary information about backups in the target database’s control files. The init.ora or spfile.ora parameter CONTROL_FILE_RECORD_KEEP_TIME determines how long information that can be used by RMAN is kept in the control file. The default value for this parameter is 7 days and can be as many as 365 days.

The recovery catalog is designed to be a central storage place for multiple databases’ RMAN information. This centralizes the location of the RMAN information instead of having this information dispersed in each target database’s control file. Here is a list of the components contained in a recovery catalog:

Backup and recovery information that is logged for long-term use from the target databases
RMAN scripts that can be stored and reused
Backup information about datafiles and archive logs
Information about the physical makeup, or schema, of the target database

RMAN (Configuration ) Using Recovery Catalog

Creating user for RMAN, grant required resources/privileges and register database

Note: Here I am not utilizing defalt rman backup location (db_recovery_dest), I will create new directory named "rman" for holding all rman backups.

Database : Oracle 10g, Oracle 11g

1. Login as sys user, create directory and permit to rman user for reading/writing backups on directory.

2. Login to database , create rman user and grant necessary privileges

SQL> set oracle_sid=orcl

SQL> sqlplus / as sysdba
Connected.

SQL> create user rman identified by rman default tablespace users temporary tablespace temp;
User created.

SQL> grant connect, resource, recovery_catalog_owner to rman;
Grant succeeded.

3. Connect to RMAN, create catalog and register database.

C:\Documents and Settings\user> rman
Recovery Manager: Release 11.2.0.1.0 - Production on Tue Jun 3 18:38:55 2015
Copyright (c) 1982, 2007, Oracle. All rights reserved.

RMAN> connect target
connected to target database: ORCL (DBID=1232238763)

RMAN> connect catalog rman/rman@orcl
connected to recovery catalog database

RMAN> create catalog tablespace users;
recovery catalog created

RMAN> register database;
database registered in recovery catalog
starting full resync of recovery catalog
full resync complete

4. View default RMAN parameters and change if required

RMAN> show all;

RMAN configuration parameters for database with db_unique_name ORCL are:
CONFIGURE RETENTION POLICY TO REDUNDANCY 1; # default
CONFIGURE BACKUP OPTIMIZATION OFF; # default
CONFIGURE DEFAULT DEVICE TYPE TO DISK; # default
CONFIGURE CONTROLFILE AUTOBACKUP OFF; # default
CONFIGURE CONTROLFILE AUTOBACKUP FORMAT FOR DEVICE TYPE DISK TO '%F'; # default
CONFIGURE DEVICE TYPE DISK PARALLELISM 1 BACKUP TYPE TO BACKUPSET; # default
CONFIGURE DATAFILE BACKUP COPIES FOR DEVICE TYPE DISK TO 1; # default
CONFIGURE ARCHIVELOG BACKUP COPIES FOR DEVICE TYPE DISK TO 1; # default
CONFIGURE MAXSETSIZE TO UNLIMITED; # default
CONFIGURE ENCRYPTION FOR DATABASE OFF; # default
CONFIGURE ENCRYPTION ALGORITHM 'AES128'; # default
CONFIGURE COMPRESSION ALGORITHM 'BASIC' AS OF RELEASE 'DEFAULT' OPTIMIZE FOR LOAD TRUE ; # default
CONFIGURE ARCHIVELOG DELETION POLICY TO NONE; # default
CONFIGURE SNAPSHOT CONTROLFILE NAME TO 'D:\APP\RAMTECH\PRODUCT\11.2.0\DBHOME_1\DATABASE\SNCFORCL.ORA'; # default

Note: Here I am changing default parameters - (you can leave it, if want to utilize default )

RMAN> configure device type disk backup type to compressed backupset;

new RMAN configuration parameters:
CONFIGURE DEVICE TYPE DISK BACKUP TYPE TO COMPRESSED BACKUPSET PARALLELISM 1;
new RMAN configuration parameters are successfully stored
starting full resync of recovery catalog
full resync complete


RMAN> configure retention policy to recovery window of 30 days;
new RMAN configuration parameters:
CONFIGURE RETENTION POLICY TO RECOVERY WINDOW OF 30 DAYS;
new RMAN configuration parameters are successfully stored
starting full resync of recovery catalog
full resync complete

RMAN> configure controlfile autobackup on;

new RMAN configuration parameters:
CONFIGURE CONTROLFILE AUTOBACKUP ON;
new RMAN configuration parameters are successfully stored
starting full resync of recovery catalog
full resync complete

RMAN> configure controlfile autobackup format for device type disk to 'D:\app\Ramtech\flash_recovery_area\%F';

new RMAN configuration parameters:
CONFIGURE CONTROLFILE AUTOBACKUP FORMAT FOR DEVICE TYPE DISK TO 'D:\app\Ramtech\flash_recovery_area\%F';
new RMAN configuration parameters are successfully stored
starting full resync of recovery catalog
full resync complete

Creating Backup Sets :

RMAN> connect target

Full Database Backup (archive logs not included)

RMAN> BACKUP DATABASE;

Note: we can also take backup as following:

Starting backup at 03-JUL-15
using channel ORA_DISK_1
channel ORA_DISK_1: starting compressed full datafile backup set
channel ORA_DISK_1: specifying datafile(s) in backup set
input datafile file number=00005 name=D:\APP\RAMTECH\ORADATA\ORCL\SDE1.DBF
input datafile file number=00001 name=D:\APP\RAMTECH\ORADATA\ORCL\SYSTEM01.DBF
input datafile file number=00002 name=D:\APP\RAMTECH\ORADATA\ORCL\SYSAUX01.DBF
input datafile file number=00004 name=D:\APP\RAMTECH\ORADATA\ORCL\USERS01.DBF
input datafile file number=00003 name=D:\APP\RAMTECH\ORADATA\ORCL\UNDOTBS01.DBF
channel ORA_DISK_1: starting piece 1 at 03-JUL-15
channel ORA_DISK_1: finished piece 1 at 03-JUL-15
piece handle=D:\APP\RAMTECH\PRODUCT\11.2.0\DBHOME_1\DATABASE\08QB4TTH_1_1 tag=TAG20150703T182801 comment=NONE
channel ORA_DISK_1: backup set complete, elapsed time: 00:02:15
Finished backup at 03-JUL-15

Starting Control File and SPFILE Autobackup at 03-JUL-15
piece handle=D:\APP\RAMTECH\FLASH_RECOVERY_AREA\C-1402635108-20150703-01 comment=NONE
Finished Control File and SPFILE Autobackup at 03-JUL-15

RMAN> run
2> { allocate channel c1 type disk;backup database format 'D:\app\Ramtech\flash_recovery_area\%d_%I_%s_%T';
3> }

using target database control file instead of recovery catalog
allocated channel: c1
channel c1: SID=21 device type=DISK

Starting backup at 03-JUL-15
channel c1: starting compressed full datafile backup set
channel c1: specifying datafile(s) in backup set
input datafile file number=00005 name=D:\APP\RAMTECH\ORADATA\ORCL\SDE1.DBF
input datafile file number=00001 name=D:\APP\RAMTECH\ORADATA\ORCL\SYSTEM01.DBF
input datafile file number=00002 name=D:\APP\RAMTECH\ORADATA\ORCL\SYSAUX01.DBF
input datafile file number=00004 name=D:\APP\RAMTECH\ORADATA\ORCL\USERS01.DBF
input datafile file number=00003 name=D:\APP\RAMTECH\ORADATA\ORCL\UNDOTBS01.DBF
channel c1: starting piece 1 at 03-JUL-15
channel c1: finished piece 1 at 03-JUL-15
piece handle=D:\APP\RAMTECH\FLASH_RECOVERY_AREA\ORCL_1402635108_11_20150703 tag=TAG20150703T183319 comment=NONE
channel c1: backup set complete, elapsed time: 00:02:15
Finished backup at 03-JUL-15

Starting Control File and SPFILE Autobackup at 03-JUL-15
piece handle=D:\APP\RAMTECH\FLASH_RECOVERY_AREA\C-1402635108-20150703-02 comment=NONE
Finished Control File and SPFILE Autobackup at 03-JUL-15
released channel: c1


Database and Archive log Backup :

RMAN> run
{ allocate channel c1 type disk;
backup database format 'db_%u_%d_%s';
backup format 'log_t%t_s%s_p%p' (archivelog all);
}
RMAN>

Note: can user following parameters if required--BACKUP (ARCHIVELOG ALL DELETE INPUT);

Using the TAG command to name the backup monthly backup.

RMAN> run
{ allocate channel c1 type disk;
backup database format 'db_%u_%d_%s' tag monthly_backup;
backup format 'log_t%t_s%s_p%p' (archivelog all);
}

We can create rman script, and execute when required :

CREATE SCRIPT wholedbbackup
COMMENT "Whole database backup and archive log"
{ ALLOCATE CHANNEL C1 TYPE DISK;
ALLOCATE CHANNEL C2 TYPE DISK;
BACKUP DATABASE [backup as compressed backupset database TAB COMPRESED_DBBK_082807];
BACKUP FORMAT 'ARC%S_%R.%T' (ARCHIVELOG ALL); }

RUN { EXECUTE script wholedbbackup; }

Backup the control file:

RMAN> BACKUP CURRENT CONTROLFILE;
RMAN> BACKUP CURRENT CONTROLFILE TO 'D:\app\Ramtech\flash_recovery_area\cntrlfile.copy';

Backup tablespace:

RMAN> BACKUP TABLESPACE system, users, tools;

Backup datafiles :

RMAN> BACKUP AS BACKUPSET DATAFILE 'D:\app\Ramtech\oradata\orcl\users01.dbf','D:\app\Ramtech\oradata\ORCL\undotbs01.dbf';

Backup parameter file:

RMAN> BACKUP SPFILE;

Backup Everything Using Backupset Command:

RMAN> BACKUP BACKUPSET ALL;

Database Recovery from RMAN backups (Examples)

Database recovery depend on events, it may requird full database recover or single database file, redolog , controlfile even spfile (parameter file), here some examples for database recover using RMAN backup.

Restore spfile from backup

RMAN> CONNECT TARGET;
RMAN> SET DBID 1232238763
RMAN> STARTUP FORCE NOMOUNT
RMAN> RESTORE SPFILE FROM AUTOBACKUP;


Restoring and recovering a datafile

RMAN> SQL 'ALTER DATABASE DATAFILE 7 OFFLINE';
RMAN> RESTORE DATAFILE 7;
RMAN> RECOVER DATAFILE 7;
RMAN> SQL 'ALTER DATABASE DATAFILE 7ONLINE';

Restore and recover a tablespace

RMAN> SQL 'ALTER TABLESPACE users OFFLINE';
RMAN> RESTORE TABLESPACE users;
RMAN> RECOVER TABLESPACE users;
RMAN> SQL 'ALTER TABLESPACE users ONLINE';

Restore and recover the whole database

RMAN> STARTUP FORCE MOUNT;
RMAN> RESTORE DATABASE;
RMAN> RECOVER DATABASE;
RMAN> ALTER DATABASE OPEN;

Monitoring RMAN Backups

Connect database and find databas dbid

SQL> connect system/manager@orcl
SQL> select dbid from v$database;

SQL> connect rman_user/rman_user@orcl
SQL> select db_key from rc_database where dbid = 1232238763
SQL> select bs_key, backup_type, completion_time
from rc_database_incarnation a, rc_backup_set b
where a.db_key = b.db_key
and a.db_key = b.db_key
and a.current_incarnation = ‘YES’;

RMAN Reporting :

RMAN> LIST BACKUPSET BY BACKUP SUMMARY;
RMAN> list backupset by file;
RMAN> LIST BACKUPSET BY BACKUP SUMMARY;
RMAN> REPORT OBSOLETE;
RMAN> REPORT SCHEMA;
Oracle Architecture :

Felt like Sharing this :


Cheers!


ORA 12514 error:TNS listener error :


Probable reasons and solutions :

One of the reasons you get that kind of error is because database instance started before listener did. Listener must always be started first.

    - Check if a database instance up and running.

    - Check the output of the lsnrctl service command and see what services are registered.

    - Check if you has SERVICE_NAME correctly specified when connecting to the instance.

    - If it happens that database instance stared before listener did sometimes you just need to wait a little or you can execute alter system register in order to register the instance.

    - Add the SID entry in TNSNAMES.ORA :

SID_NAME =
  (DESCRIPTION =
    (ADDRESS = (PROTOCOL = TCP)(HOST =hostname)(PORT = 1521))
    (CONNECT_DATA =
      (SERVER = DEDICATED)
      (SERVICE_NAME = SID_NAME)
    )
  )

Cheers!

How do you query an 11g Oracle database to get a description of an error code?


Anonymous : I want to write a procedure which will return the description of an error code I give to it. So when it's written I could call it like this:

select ora_code_desc('ORA-00000')
from dual;

And it would output:

Normal, successful completion.
Cause: An operation has completed normally, having met no exceptions.
Action: No action required.


Solution :  

It's not accessible from SQL but within PL/SQL, you can use the SQLERRM function.

For example

SQL> ed
Wrote file afiedt.buf

  1  begin
  2    dbms_output.put_line( sqlerrm(0) );
  3    dbms_output.put_line( sqlerrm(-1041) );
  4* end;
SQL> /
ORA-0000: normal, successful completion
ORA-01041: internal error. hostdef extension doesn't exist

PL/SQL procedure successfully completed.

You could, of course, build an ora_code_desc function that took in a string, removed the first three characters, passed the resulting number to SQLERRM, and returned the result

SQL> ed
Wrote file afiedt.buf

  1  create or replace function ora_code_desc( p_code in varchar2 )
  2    return varchar2
  3  is
  4    l_str varchar2(1000);
  5  begin
  6    l_str := sqlerrm( substr(p_code, 4 ) );
  7    return l_str;
  8* end;
SQL> /

Function created.

SQL> select ora_code_desc( 'ORA-00000' ) from dual;

ORA_CODE_DESC('ORA-00000')
--------------------------------------------------------------------------------
ORA-0000: normal, successful completion


Oracle also ships a utility on Unix platforms oerr that provides more detail-- particularly the cause and action you're looking for. If you really want that data too, you could write a Java stored procedure that called out to an operating system shell, executed an oerr command, and returned the result. That would give you more data but would, obviously, be much more complex.


Source :

http://stackoverflow.com/questions/11892043/query-oracle-for-ora-code-error-details


Cheers!


Top 40 Most Searched For Oracle Errors :

This is really interesting .

 
Position Error Global Monthly Searches*
1 ORA-12154 101,500
2 ORA-00600 40,500
3 ORA-01722 27,100
4 ORA-12560 22,200
5 ORA-03113 18,100
6 ORA-00604 14,800
7 ORA-00936 12,100
8 ORA-01017 12,100
9 ORA-01555 12,100
10 ORA-04031 12,100
11 ORA-00257 12,100
12 ORA-27101 12,100
13 ORA-00911 12,100
14 ORA-00933 9,900
15 ORA-01403 9,900
16 ORA-01422 9,900
17 ORA-04030 9,900
18 ORA-00932 9,900
19 ORA-01031 8,100
20 ORA-20000 8,100
21 ORA-12560 8,100
22 ORA-06508 8,100
23 ORA-01000 6,600
24 ORA-12505 6,600
25 ORA-20001 6,600
26 ORA-12519 6,600
27 ORA-01008 6,600
28 ORA-00054 6,600
29 ORA-01830 6,600
30 ORA-00907 6,600
31 ORA-00984 6,600
32 ORA-01461 5,400
33 ORA-01110 5,400
34 ORA-00001 5,400
35 ORA-02010 5,400
36 ORA-12537 5,400
37 ORA-03135 5,400
38 ORA-01034 5,400
39 ORA-00918 5,400
40 ORA-04063 5,400    


*Figures based on Google Adwords Keyword tool global monthly search average. 


Cheers!

Database Error Messages 11G:

For official Oracle site, visit the following site for all Oracle error messages including cause and solution.

http://docs.oracle.com/cd/B28359_01/server.111/b28278/toc.htm


Cheers!


ORA-38029: object statistics are locked
ORA-06512: at "SYS.DBMS_DDL", line 257
ORA-06512: at "SYS.DBMS_UTILITY", line 458
ORA-06512: at line 1


SQL> EXEC DBMS_UTILITY.analyze_schema('SCHEMA_NAME','ESTIMATE', estimate_rows => 100);
BEGIN DBMS_UTILITY.analyze_schema('SCHEMA_NAME','ESTIMATE', estimate_rows => 100); END;

*
ERROR at line 1:

ORA-38029: object statistics are locked
ORA-06512: at "SYS.DBMS_DDL", line 257
ORA-06512: at "SYS.DBMS_UTILITY", line 458
ORA-06512: at line 1


Solution :

Execute the following :


select 'exec DBMS_STATS.UNLOCK_TABLE_STATS ('''|| owner ||''','''|| table_name ||''');' from dba_tab_statistics where owner = 'SCHEMA_NAME' and stattype_locked is not null;


And then :

exec DBMS_STATS.UNLOCK_TABLE_STATS('SCHEMA_NAME','Object_NAME');


Cheers!


Thursday 2 July 2015

Rebuild All Indexes for specific User/Schema :


select 'alter index '||owner||'.'||index_name ||' rebuild online nologging;' from dba_indexes where owner=upper('SCHEMA_NAME');

Wednesday 1 July 2015

Spool File With Date/Time Name :


Way to spool  automatically :

    SET TERMOUT OFF
    COLUMN today_ddmmyyyy_col NEW_VALUE today_ddmmyyyy
    SELECT TO_CHAR ( SYSDATE, 'DDMMYYYY') AS today_ddmmyyyy_col
    FROM    dual;
    SET TERMOUT ON
    SPOOL log_&today_ddmmyyyy..log

Check Database Features :

Small topics but Useful to know which Feature you have on your database Using View :


For 9i ---> V$OPTION


For 10g and above --->  DBA_FEATURE_USAGE_STATISTICS

Cheers!
How to Check FRA Size :

The Below query To check FRA Used Space and Free Space its very Useful Query :


    set lines 100
    col name format a60
    select name
    , floor(space_limit / 1024 / 1024) "Size MB"
    , ceil(space_used  / 1024 / 1024) "Used MB"
    from v$recovery_file_dest
    order by name
    /

AWR vs ADDM vs ASH :


AWR : automatic workload repository

The AWR is used to collect performance statistics including:

    Wait events used to identify performance problems.
    Time model statistics indicating the amount of DB time associated with a process from the V$SESS_TIME_MODEL and V$SYS_TIME_MODEL views.
    Active Session History (ASH) statistics from the V$ACTIVE_SESSION_HISTORY view.
    Some system and session statistics from the V$SYSSTAT and V$SESSTAT views.
    Object usage statistics.
    Resource intensive SQL statements.


 ADDM : automatic database diagnostic monitor


Analyzes data in the Automatic Workload Repository (AWR) to identify potential performance bottlenecks.and we use it for the following cases :

         CPU bottlenecks
         Undersized memory structures
         I/O capacity issues
         High load SQL statements
         RAC specific issues
         Database configuration issues
         Also provides recommendations on hardware changes, database configuration & schema changes.

Generate ADDM  :

    Login to SQL
    @$ORACLE_HOME/rdbms/admin/addmrpt.sql
     enter system password when you asked for .
    Specify a begin_snap from the list and press Enter.
    Specify the end_snap from the list and press Enter.
     Report Name

ASH : Active Session History


statistics from the in-memory performance monitoring tables also used to track session activity and simplify performance tuning.

ASH reports Give the following information :

    Top User Events (frequent wait events)
    Details to the wait events
    Top Queries
    Top Sessions
    Top Blocking Sessions
    Top DB Object.
    Activity Over Time

 Generate ASH reports :

The Best way to do that using OEM.  (Enterprise manager).


ORA-16024: parameter LOG_ARCHIVE_DEST_1 cannot be parsed :


ORA-16024: parameter LOG_ARCHIVE_DEST_1 cannot be parsed


Cause:
Missing Space Issue

Solution
log_archive_dest_1 = 'LOCATION=D:\app\oracle\primary\ VALID_FOR=(ALL_LOGFILES,ALL_ROLES)DB_UNIQUE_NAME=primary'

Should be

log_archive_dest_1 = 'LOCATION=D:\app\oracle\primary\ VALID_FOR=(ALL_LOGFILES,ALL_ROLES) DB_UNIQUE_NAME=primary'
ORA-00265: instance recovery required, cannot set ARCHIVELOG mode :

SQL> shutdown immediate ;
ORA-01109: database not open


Database dismounted.
ORACLE instance shut down.
SQL> startup mount ;
ORACLE instance started.

Total System Global Area  285212672 bytes
Fixed Size                  2095704 bytes
Variable Size             155190696 bytes
Database Buffers          121634816 bytes
Redo Buffers                6291456 bytes
Database mounted.
SQL> alter database archivelog ;
alter database archivelog
*
ERROR at line 1:
ORA-00265: instance recovery required, cannot set ARCHIVELOG mode


SQL> shutdown immediate ;
ORA-01109: database not open


Database dismounted.
ORACLE instance shut down.
SQL> startup ;
ORACLE instance started.

Total System Global Area  285212672 bytes
Fixed Size                  2095704 bytes
Variable Size             155190696 bytes
Database Buffers          121634816 bytes
Redo Buffers                6291456 bytes
Database mounted.
Database opened.
SQL>

SQL> SQL> shutdown immediate ;
Database closed.
Database dismounted.
ORACLE instance shut down.
SQL> startup mount ;
ORACLE instance started.

Total System Global Area  285212672 bytes
Fixed Size                  2095704 bytes
Variable Size             155190696 bytes
Database Buffers          121634816 bytes
Redo Buffers                6291456 bytes
Database mounted.
SQL> alter database archivelog;

Database altered.